To mark new information message as read, follow these steps:
1. Select menu "Taxpayer → Taxpayer messages". A list of taxpayer messages is displayed (see Figure 60).
2. You can filter messages by their state choosing if you want to see only unread messages or all (see filter in Figure 60). Tick {Show only unread messages} and click [Search]. A list of unread messages is displayed.
3. Choose particular message in state "New" and click [View] next to it. The system sets the state of the corresponding message to “Read”.
Annex 1 Form filling instructions
This chapter describes functions, used in a registration or declaration form filling.
Form filling buttons and navigation
Registration and declaration forms are opened in a separate window for data filling, or amending (Figure 66). In this chapter common form filling function icons and navigating through the form are described.
Toolbar
Form title is always displayed at the top of the window. All actions can be performed, using toolbar icons (Figure 62).
|
Icon |
Description of toolbar icons |
|
|
Form page navigation buttons. They become active when you move through form pages. Click "up" arrow to navigate to the first form page, or "down" arrow to navigate to the last form page. Arrow pointing to left will return you to the previous page. Arrow pointing to the right will take you to the next form page. |
|
|
Opened page and total number of form pages is shown in a text field. You can also enter the necessary page number and click button [Show] to jump to entered page. |
|
|
Use these buttons to zoom in or zoom out form view. Additionally, you can select zoom of displayed form by selecting zoom percentage from drop-list. 100% is standard viewing zoom. |
|
|
Click this icon to save entered data from time to time. |
|
|
|
|
|
Click this icon to turn on pages management window (Figure 63). From this window you can add or remove additional pages to the declaration. This function is described in detail in a chapter of this annex Page management. |
|
|
Click this button to validate registration or declaration form. If there are any errors a list of them is displayed in an error’s pane. Click on the particular error and a field, where an error occurred is displayed to you. |
|
|
Click this button to save form in pdf format in your computer. |
|
|
Click this button to view a list of attachments, or upload a new attachment. Instructions how to upload attachment is given in chapter Upload an attachment. |
|
|
Click this button to finish filling process and to submit registration or declaration form. |
|
|
Click this button to close filler and registration or declaration form. |
Page navigation
Form pages are displayed as tabs below the toolbar. Opened
page tab will be marked in a green color, while other tabs remain grey. You can
navigate the form pages, by clicking on a necessary tab. 
After an icon is clicked, page management window is opened (Figure 63). In this window you can see form page structure in a structure tree. You can select necessary page and click button [Go to].
For some pages in a registration or a declaration form, additional pages can be added. To add additional page, page management window must be opened:
1. Select form page, to which you want to add more pages (in the picture below, page "Enterprise establishments" is selected).
2. At the bottom of page management window page information is displayed:
•Added pages (number, how many already added).
• Total allowed pages in
document.
Total allowed pages in
document.
3. If you want to add additional page, click icon in
the top of the window. A new page of selected page will be added. Use button
 to remove added page. You
can remove only additional pages.
to remove added page. You
can remove only additional pages.
4. Click button [Close], or icon  to close page management window.
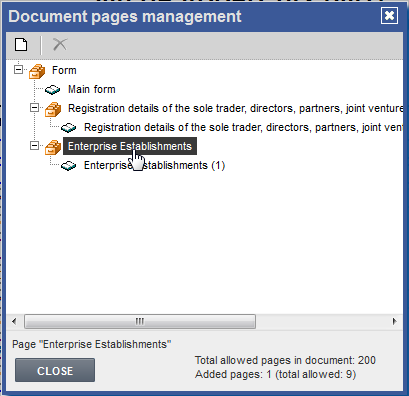
Figure 63 Pages management window
 Validation
After icon is clicked, system validates data of the registration or declaration form according to rules implemented in the corresponding registration form template. System checks, if all mandatory attachments are uploaded.
If system finds any errors or warnings, it displays them all in the bottom of the screen in an error and warnings pane (see Figure 64). You can click on the particular error/warning to be redirected to the related data field. Validation error field area can be hidden for a while, by clicking button [V] in the top of error area window. Validation error are will be hidden and only summarized information will be shown at the bottom of the form. To expand validation errors click button [^] in the toolbar (see Figure 64).
If system does not find any error, further actions can be performed.

Figure 64 Validation errors pane

Figure 65 Hidden validation errors area toolbar
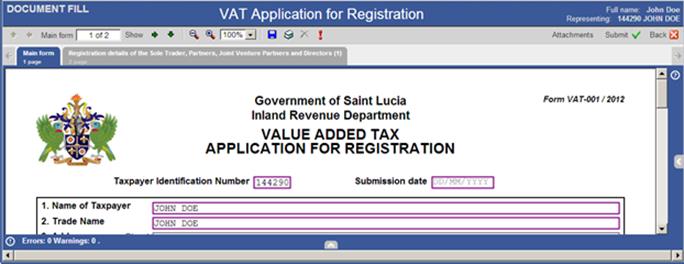
Figure 66 Filling new registration form
This function describes actions you need to perform, to view attachment list, upload a new attachment, or remove attachment from the list.
1. Click icon [Attachments] in a toolbar. Attachment list window will be opened (Figure 67).
2. Mandatory attachments are listed in the window (in the picture below you can see, that attachment "Registration of business name certificate" is mandatory).
3. Click button [Upload attachment] to upload a new file.
4. Attachment selection window is opened (see Figure 68).
5. Click button [Browse]. Find scanned file in your computer.
6. Click button [Save attachment] to save uploaded attachment. Attachment is saved and a list of uploaded attachment is displayed (see Figure 69).
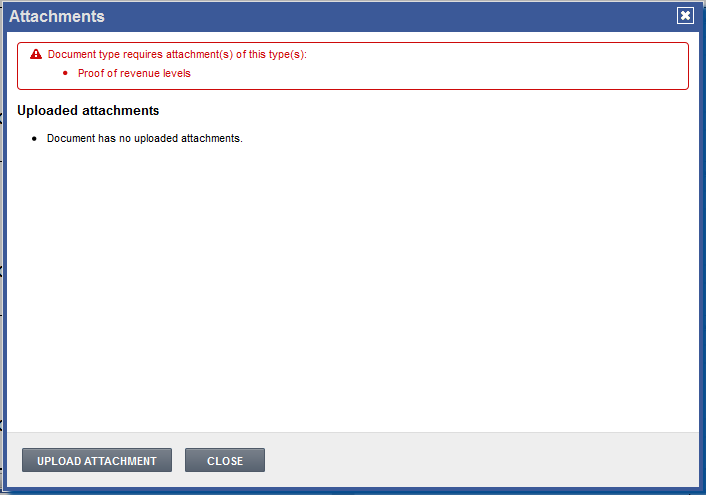
Figure 67 Form attachment window
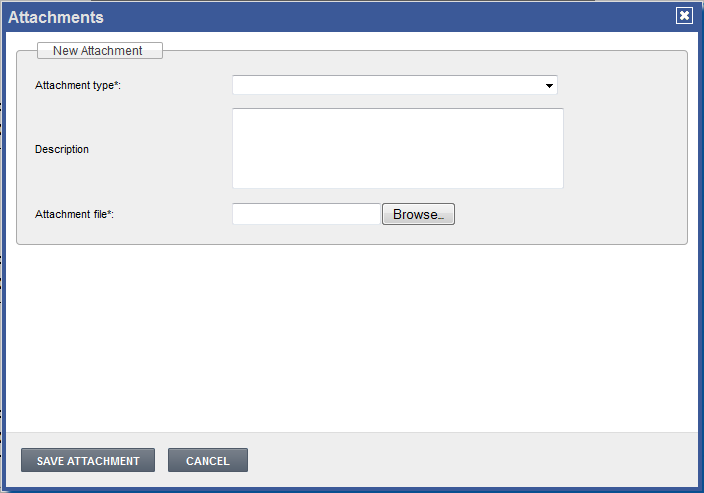
Figure 68 Attachment selection window
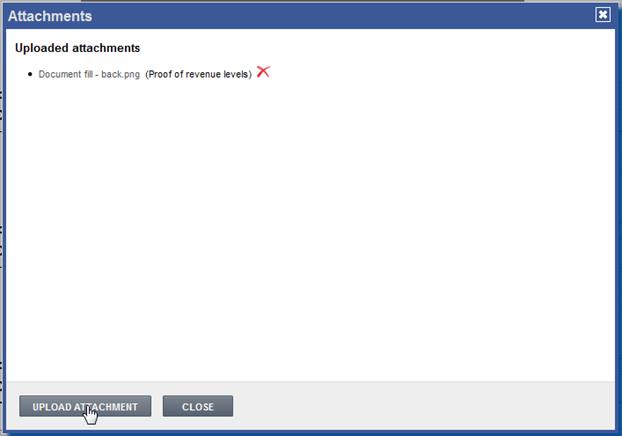
Figure 69 A list of auploaded attachments
Registration form filling instructions
You can use Filler help to read articles about declarations or registration's filling (see Figure 70).
•To
use Filler’s help you have to open a help pane of Filler. Click button  to close a Help pane or button
 to open it.
•To open a help article, click on a name of article’s title (see Figure 70). System asks you if you want to save a file o to open it in a screen (for more information read the Annex 2).
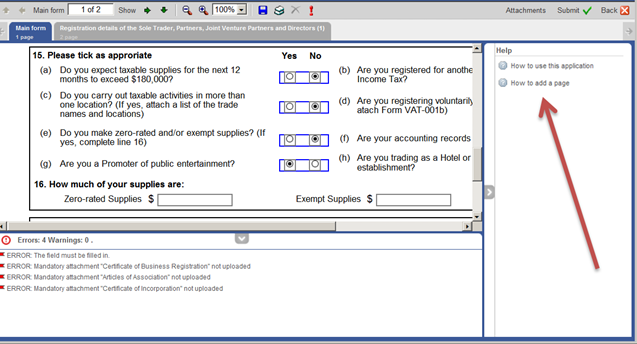
Figure 70 Filler’s help pages
Annex 2 View or download an attachment
There are several places where an attachment can be uploaded and later in view mode can be downloaded back to your computer. The functionality depends on your browser you are using. In this chapter you'll get an instruction how to deal with attachments in Mozilla Firefox browser.
To view a content of attachment or download it to your computer, follow these steps:
1. Click on the link with a name of attachment. A dialogue box with a question if you want to view or to download an attachment will be displayed (see Figure 71).

Figure 71 Dialog box for downloading or viewing an attachment
2. If you'll choose option "Open with" and a pogrom for opening, an attachment will be opened right in your screen.
3. If you'll choose an option "Save file", an attachment will be saved in your computer catalogue "Download". You should open the catalogue and double click the downloaded attachment.